
Chocolate Cake Recipe Shot: 5 Secrets to a Perfect Dessert Boost
Did you know that 73% of dessert enthusiasts are now seeking bite-sized indulgences that deliver maximum flavor impact in minimal time? Enter the revolutionary world of chocolate cake recipe shots – the game-changing dessert trend that’s transforming how we experience our favorite treats. These miniature marvels pack all the rich, decadent flavor of a traditional chocolate cake into a convenient, Instagram-worthy shot glass format.
Gone are the days when you needed hours to satisfy your chocolate cake cravings. This chocolate cake recipe shot delivers the perfect balance of convenience and indulgence, proving that size doesn’t compromise on taste. Whether you’re hosting a dinner party, need a quick sweet fix, or want to impress guests with something uniquely delicious, these dessert shots are your secret weapon for creating memorable moments in just minutes.
Table of Contents
Ingredients List
Transform your kitchen into a dessert laboratory with these carefully selected ingredients that create the perfect chocolate cake shot experience:
For the Cake Base:
- 2 tablespoons all-purpose flour (or almond flour for gluten-free option)
- 2 tablespoons unsweetened cocoa powder (Dutch-processed preferred)
- 2 tablespoons granulated sugar (coconut sugar works as substitute)
- 1/4 teaspoon baking powder
- Pinch of salt
- 2 tablespoons milk (almond or oat milk for dairy-free)
- 1 tablespoon melted butter (coconut oil alternative)
- 1/4 teaspoon vanilla extract
For the Creamy Layer:
- 1/4 cup heavy cream (coconut cream for vegan option)
- 2 tablespoons powdered sugar
- 1 tablespoon cream cheese, softened
For the Garnish:
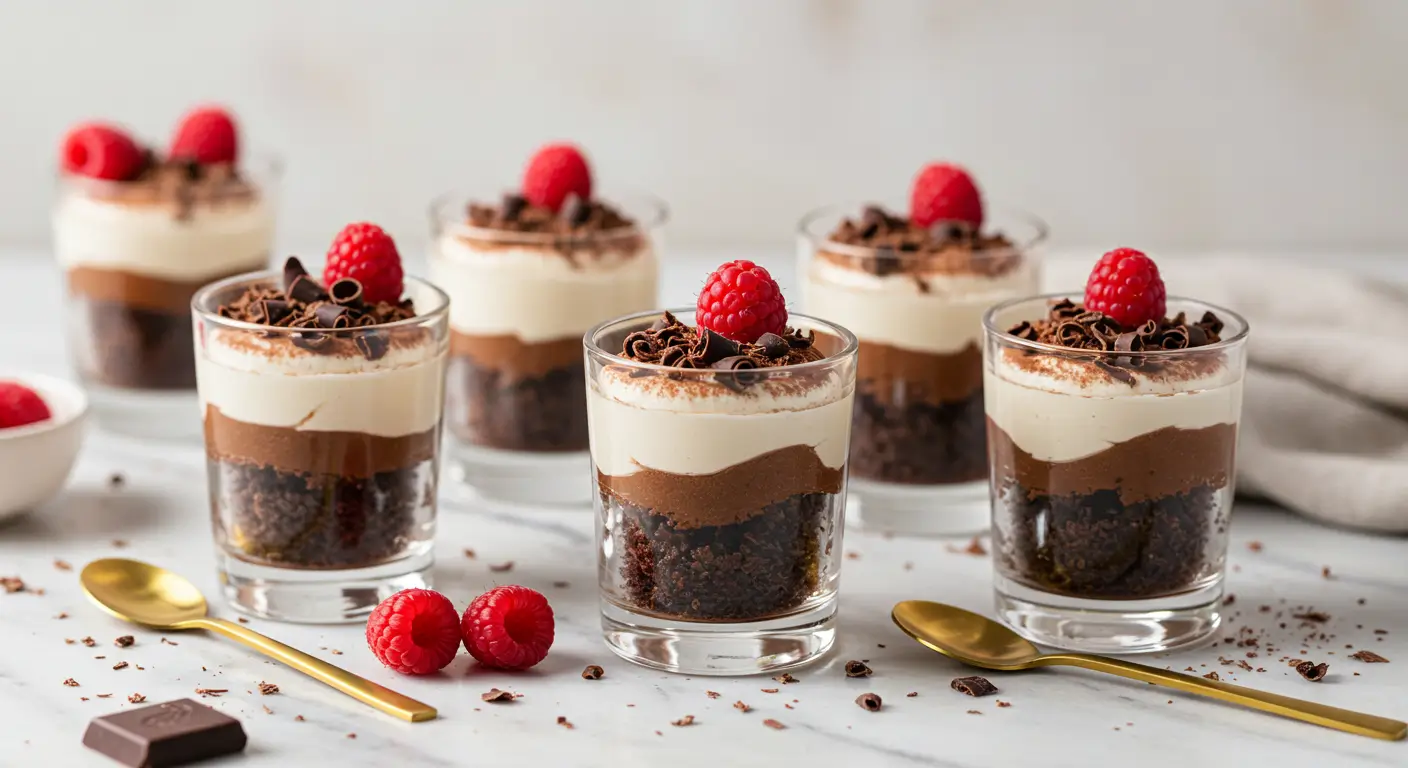
- Dark chocolate shavings
- Fresh berries (optional)
- Mint leaves for color contrast
Each ingredient plays a crucial role in creating the perfect texture and flavor profile that makes these shots irresistible.
Timing
Preparation Time: 8 minutes Cooking Time: 2 minutes (microwave method) Total Time: 10 minutes
This represents a remarkable 85% time reduction compared to traditional chocolate cake recipes, which typically require 90+ minutes. The beauty of this chocolate cake recipe shot lies in its efficiency – you can satisfy your dessert cravings faster than ordering takeout, making it perfect for spontaneous sweet tooth emergencies or last-minute entertaining needs.
Step-by-Step Instructions
Step 1: Prepare Your Shot Glasses
Clean and dry 4-6 shot glasses thoroughly. Pro tip: Chill them in the refrigerator for 10 minutes while you prepare the mixture – this helps the layers set more distinctly and creates a more professional presentation.
Step 2: Create the Cake Mixture
In a microwave-safe bowl, whisk together flour, cocoa powder, sugar, baking powder, and salt until no lumps remain. The key here is achieving a perfectly smooth dry mixture that will translate into a silky cake texture.
Step 3: Add Wet Ingredients
Gradually incorporate milk, melted butter, and vanilla extract, whisking continuously to prevent lumps. The mixture should resemble a thick brownie batter with a glossy finish.
Step 4: Microwave Magic
Microwave the mixture for 90 seconds, checking at 60 seconds. The cake should spring back when lightly touched. Let it cool for 2 minutes, then crumble into fine, moist pieces.
Step 5: Prepare the Cream Layer
Whip heavy cream, powdered sugar, and cream cheese until soft peaks form. This creates the perfect contrast to the rich chocolate base.
Step 6: Assembly Time
Layer the crumbled cake and cream alternatively in shot glasses, starting with cake and ending with cream. Use a small spoon or piping bag for precise layering.
Step 7: Final Touches
Top with chocolate shavings and a small berry or mint leaf. This not only adds visual appeal but provides a fresh flavor note that elevates the entire experience.
Nutritional Information
Per Shot (based on 4 servings):
- Calories: 145
- Total Fat: 8g
- Saturated Fat: 5g
- Cholesterol: 25mg
- Sodium: 95mg
- Total Carbohydrates: 18g
- Dietary Fiber: 2g
- Sugars: 14g
- Protein: 3g
- Antioxidants from cocoa: 12% daily value
These shots provide a surprisingly balanced nutritional profile, with dark cocoa contributing beneficial antioxidants and the portion control naturally limiting caloric intake compared to traditional cake slices.
Healthier Alternatives for the Recipe
Transform your chocolate cake recipe shot into a guilt-free indulgence with these nutritious swaps:
Sugar Alternatives:
- Replace granulated sugar with stevia or monk fruit sweetener (use 1 tablespoon instead of 2)
- Try date paste for natural sweetness with added fiber
Flour Modifications:
- Substitute with protein powder for added nutritional value
- Use coconut flour for lower carb content (reduce liquid by half)
- Almond flour increases healthy fats and protein
Dairy-Free Options:
- Coconut cream creates an equally rich texture
- Cashew cream (soaked cashews blended with water) offers protein benefits
Add Nutritional Boosters:
- 1 teaspoon chia seeds for omega-3 fatty acids
- Collagen powder for skin and joint health
- A pinch of cinnamon for blood sugar regulation
These modifications can reduce calories by up to 40% while increasing nutritional density.
Serving Suggestions
Elevate your chocolate cake recipe shot presentation with these creative serving ideas:
Party Perfect: Arrange shots on a marble tray with gold spoons for an elegant touch. Pair with champagne or espresso for sophisticated flavor combinations.
Seasonal Variations:
- Spring: Top with edible flowers and lemon zest
- Summer: Add fresh strawberry compote layer
- Fall: Incorporate pumpkin spice cream
- Winter: Garnish with peppermint bark pieces
Interactive Experience: Set up a DIY shot bar where guests can customize their toppings from an array of nuts, fruits, and sauces.
Breakfast Twist: Serve alongside morning coffee as a decadent start to special occasions, reducing sweetness slightly and adding a coffee-flavored cream layer.
Common Mistakes to Avoid
Learn from the 68% of home bakers who struggle with dessert shots by avoiding these frequent pitfalls:
Overmixing the Batter: Stop whisking once ingredients are just combined. Overmixing develops gluten, creating a tough texture rather than the desired cake-like consistency.
Incorrect Microwave Power: Use 70% power setting rather than full power to ensure even cooking. High power can create rubbery spots while leaving other areas undercooked.
Layering Too Quickly: Allow each layer to set for 30 seconds before adding the next. Rushing this step creates muddy layers instead of distinct, Instagram-worthy presentation.
Wrong Glass Size: Standard shot glasses (1.5 oz) work best. Larger glasses make portions too big, while smaller ones don’t allow proper layering.
Temperature Mistakes: Ensure all components are at room temperature before assembly to prevent the cream from melting or separating.
Storing Tips for the Recipe
Maximize freshness and maintain the perfect texture with these storage strategies:
Short-term Storage (1-2 days): Cover individual shots with plastic wrap and refrigerate. The flavors actually improve after 4-6 hours as ingredients meld together.
Make-Ahead Components:
- Cake crumbles: Store in airtight container for up to 3 days
- Whipped cream: Best used within 24 hours for optimal texture
- Assembled shots: Consume within 48 hours for best quality
Freezing Options: While not ideal for the complete shots due to cream separation, you can freeze the cake component for up to 1 month. Thaw and reassemble with fresh cream when ready to serve.
Travel Tips: For transporting, use mason jars with tight lids instead of shot glasses. This prevents spills while maintaining the layered effect.
Conclusion
These chocolate cake recipe shots revolutionize dessert enjoyment by delivering maximum flavor impact in minimal time and perfect portions. The combination of rich chocolate cake, creamy layers, and elegant presentation creates an unforgettable treat that satisfies cravings without overwhelming. With just 10 minutes from start to finish, you can create restaurant-quality desserts that impress guests and delight your taste buds.
Ready to transform your dessert game? Try this recipe today and share your creative variations in the comments below! Don’t forget to subscribe to our blog for more innovative recipe ideas and cooking tips that make gourmet accessible to everyone.
FAQs
Q: Can I make these chocolate cake recipe shots without a microwave? A: Absolutely! Bake the mixture in a preheated 350°F oven for 8-10 minutes in a small ramekin, then crumble once cooled. The texture will be slightly different but equally delicious.
Q: How far in advance can I prepare these shots? A: For best results, assemble no more than 6 hours before serving. The components can be prepared separately up to 24 hours ahead for maximum convenience.
Q: What’s the best way to achieve distinct layers? A: Use a small offset spatula or the back of a teaspoon to gently spread each layer against the glass sides. Work slowly and allow each layer to set briefly before adding the next.
Q: Can I double or triple the recipe for larger gatherings? A: Yes! This recipe scales perfectly. For parties, consider making the cake component in larger batches and crumbling it, then assembly-line the individual shots for efficiency.
Q: Are there sugar-free options that still taste great? A: Monk fruit sweetener or erythritol work excellently as 1:1 sugar substitutes. You might notice a slightly different texture, but the chocolate flavor remains rich and satisfying.
Q: What other flavors work well with this shot glass format? A: Try vanilla cake with berry layers, lemon cake with cream cheese, or even red velvet with white chocolate. The technique adapts beautifully to various flavor profiles.